| What's New on the Building Board |

|
|
April 21st, 2016 Covering the Luscombe Model 10 No-Cal. Since I don't have enough hands to both cover the model and take pictures at the same, a simple overview of the covering process will have to suffice. Since the tissue has already been decorated, it's now just a matter of adhering the tissue to the structure. Here's the steps I take when covering:  1) Apply adhesive to the structure.
When I first started building No-Cals, I used butyrate dope and thinner for an adhesive. Then a newsletter suggested using a glue-stick, which I tried once. I immediately switched to a glue pen, the liquid from the pen being much easier to spread than the sticky glue from a glue stick. Then I learned the trick of using spray adhesive, and I have been using it ever since. Here's how I do it: 1) Spread newspaper out on the floor (use LOTS of newspaper - you don't want adhesive overspray on your floor). 2) Lay the piece of structure on the newspaper. If it is a particularly light-weight piece of structure, use a very small piece of adhesive tape to hold it in place. 3) Shake the can of adhesive well, and spray a LIGHT even coat of adhesive on the structure. 4) Move the piece of structure onto a clean piece of paper on the ironing board, close to where you do the ironing. 5) Turn the piece of decorated tissue upside down and iron flat. Note the location of any alignment marks on the tissue, and using those alignment marks, 6) Press the structure onto the upside-down piece of tissue. Your structure is now covered. At this point, I move the structure to a harder flat surface and press again to make sure the tissue is adhered to all parts of the structure. BUT! You say . . . What about the wing? It's not flat! I can't press it down flat! True enough. Not only is it not flat (the dihedral has already been set), but it also has a curved upper surface, which makes things even more interesting. Here's how I handle it. 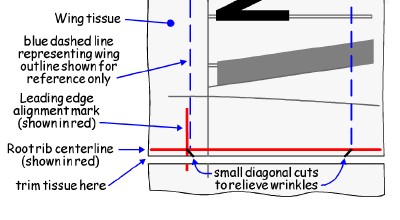 a) First, trim the decorated wing tissue parallel with the root rib centerline so that there will be about 1/8 inch overlap of the root rib. This will help minimize tissue wrinkling at the leading and trailing edges of the root rib. If you like, small diagonal cuts can be made in the tissue at the root rib centerline to further minimize tissue wrinkling.
b) Now place the wing structure on the newspaper, and c) Tape a piece of newspaper over one of the wing halves so that only one half is exposed to the spray adhesive. d) Apply spray adhesive to the exposed half, and then e) Move the wing to the ironing board and place on a piece of clean paper, so as not to get adhesive on the ironing board fabric. f) Place the decorated wing tissue UPSIDE DOWN on the ironing board. g) Iron the tissue flat again. 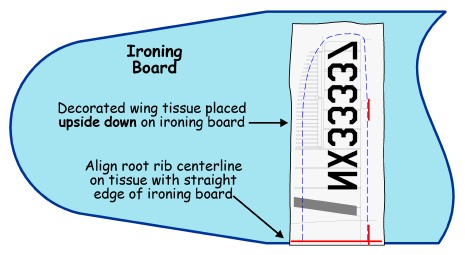 h) Align the tissue with the root rib center line aligned with a straight side of the ironing board like this . . .
i) Iron the tissue flat again. j) Turn the wing structure upside down and line the wing leading edge up with the leading edge alignment marks on the tissue, press the leading edge into place, and then gently roll the wing onto the tissue, pushing down lightly on the inside of the ribs as you roll it. k) Turn the structure over, and gently press the tissue down on the leading and trailing edges to assure a good bond. Run the wingtip between a finger and thumb to do the same. Do likewise with the root rib and each wing rib, and then set it aside to dry. l) When dry, trim the excess tissue with a razor blade, and you're done! Here's a shot of all the covered parts ready for assembly . . . 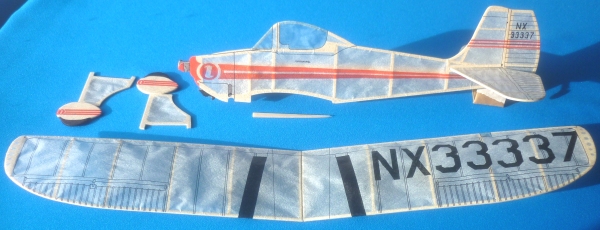 Next up: Assembling the parts. |
|
|