| Back to the Plastic Scale Modeling page
|
|

|
 Alien Abduction Lamp
  by Michael Morrow I first saw the idea for an alien abduction lamp on the internet as an entry in a Five Dollar Challenge. The idea was to make a home décor item that had a total cost of $5. I thought the concept of an Alien Abduction Lamp was so cool, I decided to make one myself. I originally tried to meet the $5 target, but I didn't have certain items, like the paint, and other items were just not available in the desired price range, so I finally decided to just make it the way I wanted, and try to keep the cost as low as I could. In the end, I missed the $5 target by more than just a wee bit! Finding the Parts I started off with a basic list I had gotten off the web-site where I first saw the Alien Abduction Lamp. I made a copy of the list on a business-card-sized piece of note card, and kept it in my wallet so that I'd have it if I happened to be somewhere that might have an item on the list. I'd originally intended to try to keep within the $5.00 limit, so I didn't make any special trips for components, only buying items that I found when shopping for other items. The gratification when I found something on the list that was also inexpensive, and that I hadn't had to make a special trip for was great, but it also took months to find all the parts. 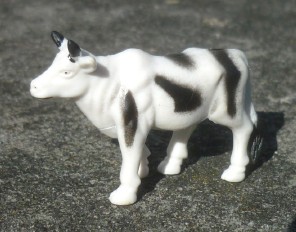 The very first thing I found was the plastic cow (Why is it always cows that get abducted?). Our local gift/card shop has all manner of little novelty items that can be used as toys, cake decorations, or just collected, and range from small wind-up friction race cars, to little parachute men, tiny plastic cars, planes, and train engines, little cats and dogs, and, most importantly for this project, an entire box of little farm animals containing a most realistic cow. I was most pleased that I only had to spend 55 cents for this precious find! Funny enough, the cow was the very last item found by the author of the build article I first saw.
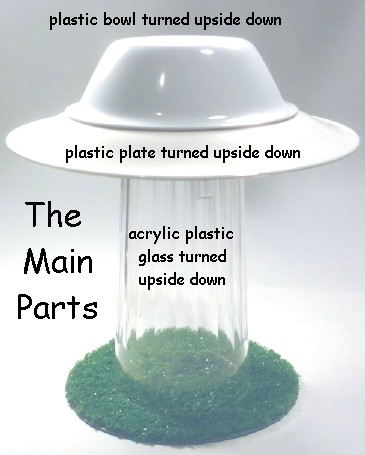 The Main Parts
The main parts of the alien abduction lamp are the flying saucer and the abduction beam. My flying saucer consists of an upside down plastic bowl sitting atop an upside down plastic plate. The saucer sits on top of the abduction beam, which is an upside down acrylic plastic glass. The author of the alien abduction lamp build that I used as inspiration for this project got most of her parts from a Dollar Store. I had intended to do the same, but there is no Dollar Store anywhere near my regular haunts. When I finally did happen to get to a Dollar Store, it was on a trip out-of-state, which made it all the more fun. I picked up the "touch light", which provides the components for lighting the abduction beam, and spent a lot of time perusing the aisles looking at plastic bowls and plastic plates and acrylic plastic glasses, but didn't see anything that looked the way I wanted it to look. Back home, I eventually found the plastic plate on sale at a Pier 1 Imports shop, and the plastic bowl on sale at a Target store. I was never able to find the unique dimpled acrylic glass that was used on the original build, so I eventually settled for a fluted style which were two for $1.79 at a Rite-Aid drug store. During the construction process I managed to destroy both of the acrylic glasses AND the bowl, so I had to go back and get another set of glasses, and at the same time, discovered that Safeway had holiday bowls of almost the exact shape I was looking for on a close-out sale, so I got one of those to replace the one I had broken. Some of the parts were so difficult to find, that I eventually I gave up on my self-imposed "no special trips" rule. The three little green Martians were the worst offenders on the list. The "no special trips" rule also went out the window when I had to go back to replace the acrylic glasses I had broken. During the process of construction, I made several changes to my parts list which required making special trips, and I eventually gave up trying to stay within the $5.00 limit. Especially when I discovered that the indoor/outdoor carpet I needed for a base sold for $5.00/foot, and the paint sold for $7.00 a can, neither of which I had on hand. It ended up turning out pretty cool though, so I wasn't too disappointed. The Pieces I Used For The Project Here's a picture showing all the parts I used for this little project . . . 
The circle of indoor/outdoor carpet shown in the picture above ended up looking too small under the finished lamp, so I replaced it with a larger circle when I was done. Also, in this picture, the chrome reflector from the one-touch light is already mounted to the top of the acrylic glass with it's three mounting screws instead of being shown with the rest of the one-touch light parts. Making the Lamp Examination of the One-Touch Light proved that the method used to activate the switch on it was too cheaply executed to be a reliable light switch. In fact, it was so cheap, it almost never worked, so I disassembled the light to see what would be worth keeping. I ended up keeping the printed circuit board (henceforth, the PCB) with it's LEDs, and the chrome plastic reflector. Everything else was tossed. The chromed plastic reflector needed to be attached to the bottom of the acrylic glass. This required cutting a hole in the bottom of the glass big enough for the LEDs to shine through, but not too big to prevent mounting holes from being drilled around the edges. Look carefully at the picture. There are TWO sets of mounting holes. The inner set is used for mounting the reflector in place, and the outer set is used to screw the plate in place on top of the glass. 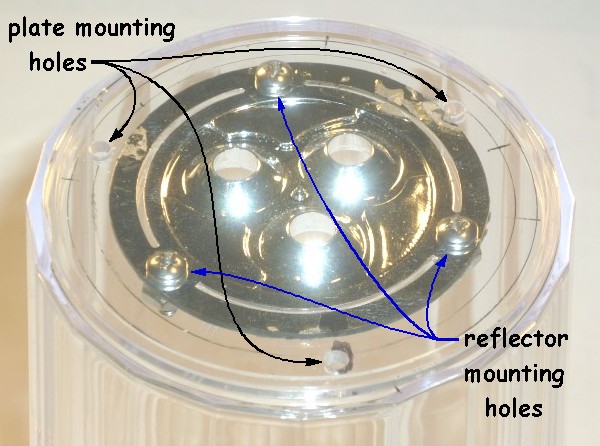 I used a circle template to carefully plot the positions of both sets of holes to make sure there was room for them, and that they didn't interfere with each other. The reflector had three convenient spots to drill small mounting holes, which I carefully drilled. The acrylic glass was not so cooperative. The three small holes were carefully drilled in the glass to match the holes in the reflector, and three more holes for mounting the plate to the glass, and then I tried to get fancy. The original builder said to use a hobby knife and hand files to make the large hole. But why use hand tools, when you've got a drill press and a circle-cutter? Soooo, I chucked up the circle cutter, and . . . BANG! Small pieces of acrylic plastic went flying everywhere. Noooo problem, I says to myself. I've got a spare acrylic glass. I'll just drill slower this time. So I drilled the three small reflector mounting holes again, and the three small plate mounting holes again, and very carefully, and very slowly used the circle cutter to cut the larger hole in the middle until . . . BANG! And I had another piece of scrap acrylic glass. Hmmmm. Maybe I'll just have to use a half-round hand file. Like the original builder did. Turns out that the acrylic used for the glasses was just too brittle to use large drills on. I went back to the Rite-Aid, picked up another pair of acrylic glasses, carefully drilled the six small mounting holes, drilled a couple more small holes in the center and around the edge of the larger circle which I could connect by scribing, and proceded to VERY CAREFULLY scribe the large hole using a hobby knife. This was VERY tedious and time-consuming because (1) I didn't want to cut myself, and (2) I didn't want to break it and have to do it over again. When I was finally able to CAREFULLY snap the scribed bits out, I finished up the large hole with a half-round hand-held file. With the large hole finished, I screwed the reflector into position, and Voila! Step one was done. 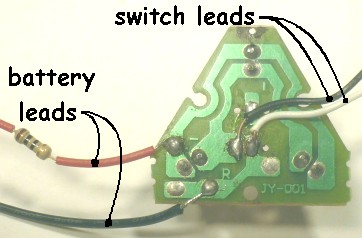 An examination of the miniscule little switch on the back of the PCB board proved it wouldn't be of much use, so I decided to remove it and run wires to a new switch. I used a low-wattage soldering iron to de-solder the switch from the board, and then soldered lead wires to the appropriate spots on the printed circuit. This was a little tricky, as they were quite close together. I had already picked up a battery holder for three AAA batteries wired in series. To attach it, I de-soldered the black battery lead from the PCB and soldered the battery holder black lead in it's place, then desoldered the end of the red lead from the resistor, and resoldered the resistor lead to the red lead from the battery holder. In this picture, you can see the battery holder leads attached to the resistor and the PCB on the left, and the two switch leads on the right.
 |
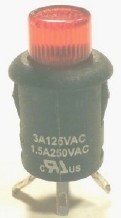
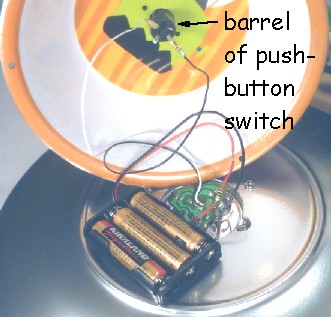
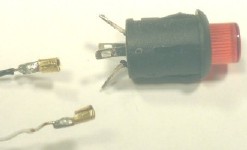 I had decided early on that I wanted an external switch, so I picked up a switch at Radio Shack that I could snap into a hole to be drilled in the top of the bowl of the flying saucer. The switch had four leads, but I would only be using two of them.
Note the retention clips on the sides of the switch barrel. These allow the switch to be pressed into a properly-sized hole and hold it in place in the hole. I also wanted to be able to disassemble the saucer for maintenance or to change batteries, so I needed removeable connectors for the tiny little leads on the switch. No press-on leads were available in such small sizes, so I fabricated a couple out of sheet brass, and soldered them to the ends of the switch leads coming from the LED PCB. 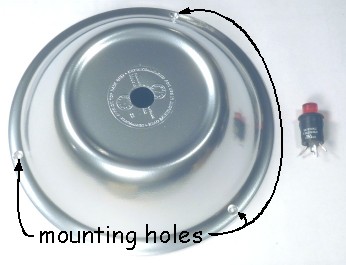 With the switch ready, we'll need a place to put it. The top of the flying saucer is the bowl turned upside down. I marked the center of the bowl, measured the diameter of the switch barrel, and drilled a hole that size.
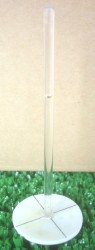
I wanted a way to mount the top of the saucer (the bowl) to the bottom of the saucer (the plate) in such a way that the bowl could be removed to change the batteries, so I decided to use screws and nuts. I marked the location of the three mounting holes at 120 degree intervals arond the edge of the bowl, propped up the lip of the bowl on a block of wood so the drill bit would have a solid surface to drill against (see figure below), and drilled the holes. I countersunk each hole so that the mounting screws would be flush with the surface and less visible. 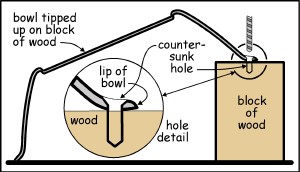 With the three mounting holes drilled around the rim of the bowl, you can place the bowl on top of the plate, and either mark and drill the holes in the plate, or tape the bowl securely to the plate (LOTS of tape!) and use the counter-sunk holes as pilot holes to drill through the plate.
Now it's time to drill the big hole in the center of the plate. This is another one of those work slowly and carefully operations. Drill a bunch of small holes and scribe between them (I may actually have successfully used the circle-cutter on this one - I can't remember). After the main large hole has been cut out and cleaned up, use a file to make the three half-round clearance holes for the reflector mounting screws, and you're done fabricating the plate. With all the holes drilled, it's time to paint the saucer parts. I used chrome silver automotive paint from a spray can, but you can use any color you want. When the paint is dry, assemply can begin. Here's the painted plate ready to be screwed to the top of the acrylic glass. It was pretty tricky getting the screws into the nuts up inside the acrylic glass. :-) 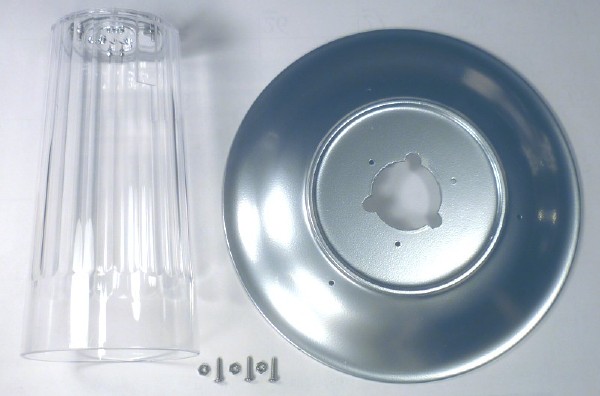 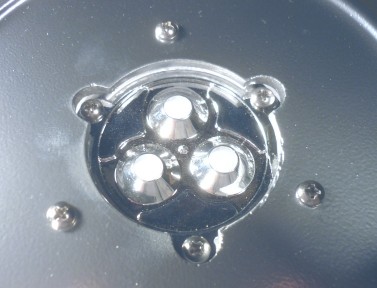 . . . and here's a close-up top view of the plate screwed to the top of the glass . . .
The three outer screws hold the plate to the acrylic glass, and the three inner screws hold the reflector to the glass. In order to provide enough clearance between the outer mounting holes and the large inner hole, I made the large inner hole smaller than the diameter of the three inner screws, and just provided half-round clearance cutouts for the three inner screws. 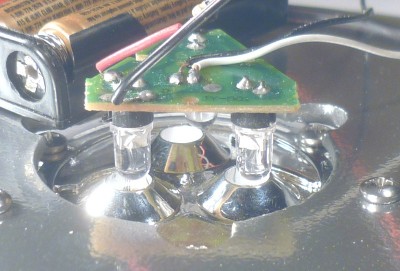 With the plate mounted to the top of the abduction beam (the acrylic glass), it's time to fit the lights to the reflector. Here you can see the LED lights on the printed circuit board being fitted into the holes in the reflector . . .
I did not use a positive attachment method to hold the PCB and lights in place. When the rest of the interior assembly was finished, I simply placed a piece of compressible foam on top to hold it there. On the left below you can see the battery pack and the LED PCB in place on top of the plate. The two unattached lower wires with their brass connectors will be attached to the contact pins on the push-button switch mounted in the bowl. On the right you can see the push-button switch pressed into the hole in the top of the bowl. 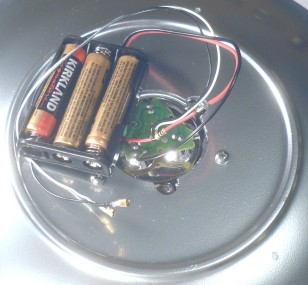
 |
 Here the battery pack leads have been connected to the connector pins on the barrel of the switch, which can be seen protruding from the inside of the bowl, which, sadly, I neglected to paint (the inside of the bowl, not the switch).
With all the electrical connections completed, now is the time to test the switch and lights. If everything works, then it's time to screw the bowl onto the top of the plate. Place the bowl on top of the plate, align the three fastener holes, and insert a flat head screw in each of the three holes. You may have to use a screwdriver to fully seat the screws in the holes. With all three screws in place, thread a nut over each screw where it protrudes from the bottom of the plate, tighten them down, and except for some finishing details, your Alien Abduction Lamp is now complete. The bowl on top of the plate . . . 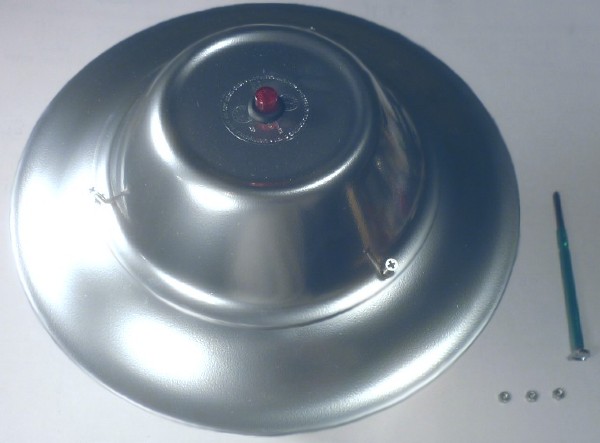 |
. . . flat head screws slipped into the holes . . .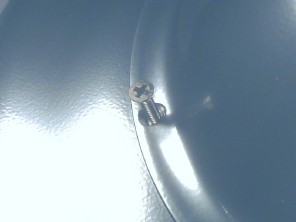
|
. . . screwed in flush, nuts on the bottom . . .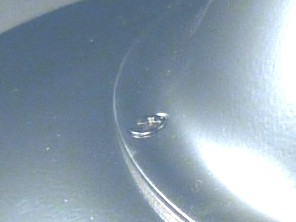
|
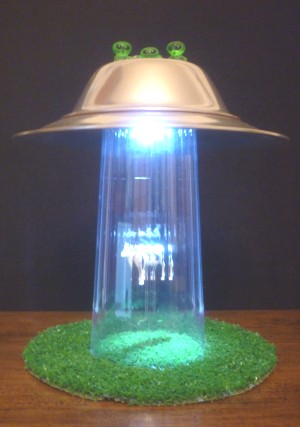
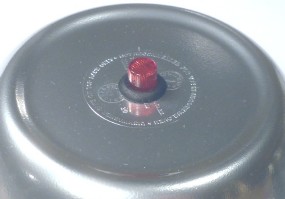
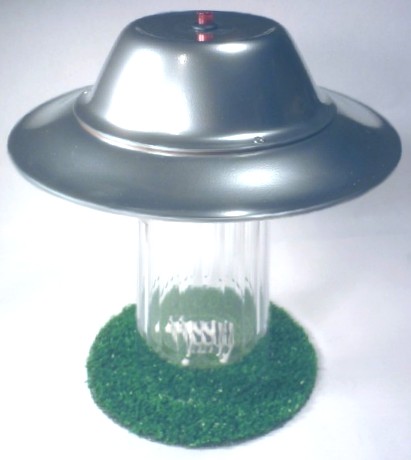 . . . and the flying saucer part of the lamp is complete. Now set the cow in the middle of the circle of grass, place the glass over the cow, and your Alien flying saucer is ready to abduct the cow.
To activate the transporter beam, simply push the button switch on the top of the lamp to turn the lamp on, and Voila! The light lights up the cow, and shines down inside the glass, making the glass look just like a transporter beam. Pretty cool, huh? Alien Abduction Lamp . . . with cow! -------> While pretty neat, I felt my Alien Abduction Lamp could do with some improvements and a couple of finishing touches. 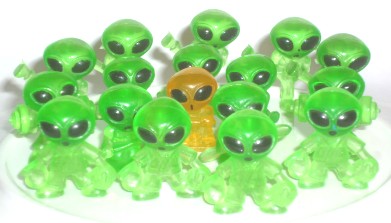 First off, a Martian flying saucer needs LITTLE GREEN MARTIANS! Finding a vending machine that sold little green Martians was nearly impossible, and after spending several months looking for little green Martians in vending machines in every store imaginable across three states (no I didn't drive to another state looking for Martians - they were searches of opportunity), I finally got lucky and found exactly the ones I was looking for. I got my little green Martians for 25 cents each from a vending machine in a Saurs grocery store which was actually pretty close. Relatively speaking. :-) (yeah, I'd never heard of Saurs before either, and that particular Saurs store has now closed). Once I'd found that vending machine though, I took every opportunity to get more Martians. What can I say - I had a deprived childhood. :-) And then the store closed. :-(
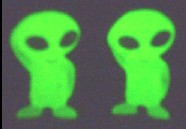
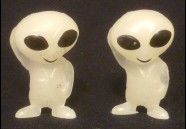 I was crushed. *Crushed*, I tell you. But then miracle of miracles, I found another source, this time in a big Safeway grocery store, which had the added benefit of being much closer. And this one had translucent GLOW-IN-THE-DARK MARTIANS! Woo-Hoo! Unfortunately, they were 50 cents each, but hey - GLOW-IN-THE-DARK! Now it's just possible that there are no vending machines in your area that stock little green Martians, or even GLOW-IN-THE-DARK Martians, but FEAR NOT! There is another . . . (source).
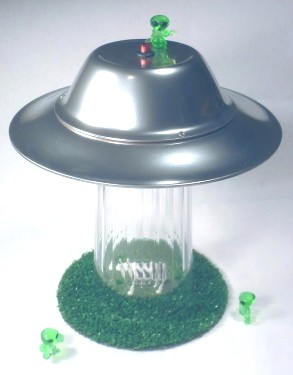 Long after I was all Martian'd-up, on a lark, I checked AMAZON, and WOW! Martians galore! Both my favorites, the green, and GLOW-IN-THE-DARK ones, are available, but only in bulk. You can get from 20 to 250 Martians at a shot! In retrospect, for all the gas money I spent looking for Martian vending machines, I would have saved a LOT ordering them from AMAZON. If I'd thought of it first. But what fun would that have been? :-)
. . . . . New! . . . . . . Improved! . . . . . . . With Martians! ----------> Secondly, the circle of grass under the saucer (see right) looked much too small, so I cut a bigger one. A circle about 8" in diameter looked good when placed under the saucer. Thirdly, if the Martian is abducting the cow with an abduction beam, the cow really does need to be levitating. There are a couple of ways to do this, but being an old plastic modeler from waaaaayyy back, I have boxes of old model parts, and I just happened to find a piece of old clear sprue from some long-forgotten kit. I cut the clear sprue to length, sanded it (more) round, and polished it so it wouldn't reflect too much light. 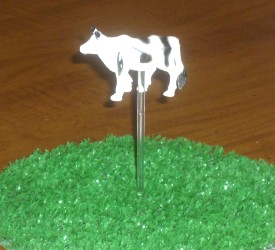
 A drill bit of the same diameter was fished out of my drill bits box, and I managed not to injure myself drilling a hole in the bottom of the cow for the piece of sprue to fit into. The sprue was then glued to a small piece of flat sheet plastic to keep it vertical, and left to dry. When the glue was thoroughly dry, I made a small hole in the middle of the piece of "grass", slipped the sprue into the hole from the bottom, pressed the cow onto the top of the piece of sprue, and Voila! One levitating cow!
There are other ways to suspend the cow inside the glass than the way I did it. If you don't have any clear plastic sprue from a model kit, you might try one of the following ideas: . . . look in a Michael's craft store for some similar kind of clear plastic rod, or . . . you might try suspending the cow from clear nylon fishing line hanging from a small hole in the center of the reflector at the top of the glass, or . . . or you might suspending the cow the same way using some clear "invisible thread" available at fabric stores. 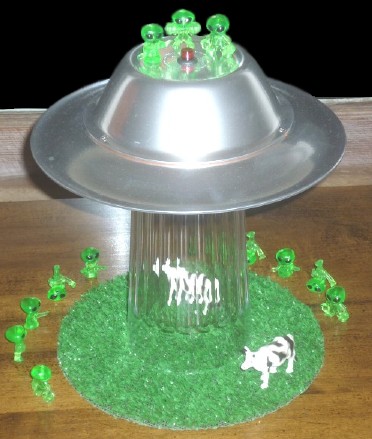 So here's the finished Alien Abduction Lamp, complete with -
. . . a levitating cow . . . . a bigger field of grass . . . . . . . and MORE Martians! |
. . . And here's one last shot of our alien flying saucer rustling a cow at night. . .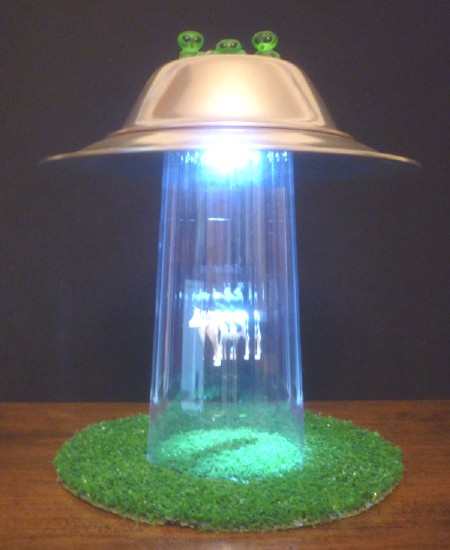
|
|
Here's a list of the components I used, and where they came from:
|