|
|
 |
 |

|
These notes are
intended to help get the best performance from your CR-3 flying model. Each of
these tips was gained by experience flying my own CR-3, along with comments
from others. Incorporate any of these that you find useful. 1) Use
cotter pins to keep the rear motor tube from vibrating out. I didn't at first,
and the rear motor tube vibrated out, snapping through to the nose with all
the rubber. The big wad of rubber in the nose significantly altered the CG,
and the resulting dive from 60-80 feet altitude was breath-taking for
it's speed and steepness. I'm amazed the model survived with no
damage!
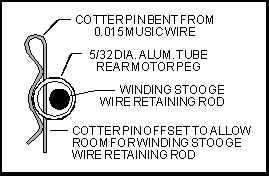
1) Use
cotter pins to keep the rear motor tube from vibrating out. I didn't at first,
and the rear motor tube vibrated out, snapping through to the nose with all
the rubber. The big wad of rubber in the nose significantly altered the CG,
and the resulting dive from 60-80 feet altitude was breath-taking for
it's speed and steepness. I'm amazed the model survived with no
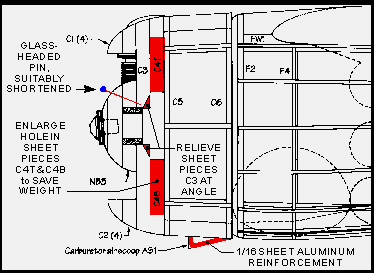
damage!2) Push glass head pin through noseblock at downward angle to keep noseplug from falling out in flight. The long motor (two 30" loops of 3/16 inch Tan II, or one 60 inch loop folded in half) vibrates at end of motor run. In spite of nose block having a very snug fit, the nose plug fell out twice at altitude, VERY effectively dethermalizing the model (a near vertical dive!). See picture below.  3) My model initially flew very well with the right thrust shown on the plan. Since
then, it has developed "personality". The same amount of right thrust now results in a right spiral dive into the ground under initial high launch thrust. Reducing right thrust by half restored a proper flight pattern. Keep in mind, and incorporate if necessary.
3) My model initially flew very well with the right thrust shown on the plan. Since
then, it has developed "personality". The same amount of right thrust now results in a right spiral dive into the ground under initial high launch thrust. Reducing right thrust by half restored a proper flight pattern. Keep in mind, and incorporate if necessary.4) Relieve sheet pieces C3 at angle to prevent rubber from hanging up - see picture at right. Rubber bunching up at the noseblock was catching on the back inside of the C3 pieces, stopping the prop before the motor was finished unwinding. 5) My model came out nose-heavy. I added clay to the tail. To reduce nose weight, cut larger hole in pieces C4B & C4T. See picture at right. Leaving balsa cylinders off until you are sure model balances may help. (use paper engine on plan) 6) The carburetor airscoop on cowl bottom will always touch first on landing (on model built with gear up). I bent up a 1/16" sheet aluminum reinforcement, trimmed the balsa airscoop, C/A'd the aluminum on, and painted it. Reinforcing helps, but any hard landing will rip it off. Leaving airscoop off will prevent more serious damage to the cowl. See picture above.  7) Depending on how carefully the model has been constructed, it may need a 1/64 spacer
under the LEADING edge of the stabilizer. If your model
needs it, the bottom of the tail fin will have to be cut away to
allow this. See picture at right.
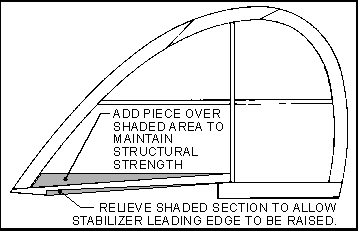
7) Depending on how carefully the model has been constructed, it may need a 1/64 spacer
under the LEADING edge of the stabilizer. If your model
needs it, the bottom of the tail fin will have to be cut away to
allow this. See picture at right.8) Decals: They're thin for maximum ability to conform to the surface. They'll snug right down over any surface no matter how irregular. That said, they are also more difficult to apply because of their size. Use lots of water, and make sure the decal is positioned exactly where you want it before applying. Slide it off the backing paper evenly. Use plenty of water to float the decal into place, and to smooth out any wrinkles BEFORE the decal settles. Otherwise, they're there to stay. This model is a great little flier - I hope you enjoy it! -- Michael A. Morrow -- See color photos at www.aeroaces.com
|