|
|
 |
 |

|
|
This is how you can more than DOUBLE your CR-3 flight times with ONE CHANGE - switch to a 10 inch diameter balsa prop! Here are the dimensions for the prop I used that more than doubled my flight times. 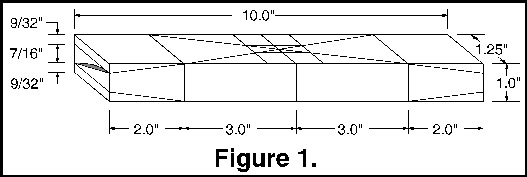 It's possible this prop can be improved by changing the block thickness from 1 inch to 7/8 inch, leaving all other dimensions the same (except for the two 9/32 inch dimensions, which will change to 7/32 inch). This will decrease pitch a little. I used a 1 inch by 1 1/4 inch block to save time, and it still more than doubled my flight times!
Figure 2 shows two more dimensions that you will need to rough out the block. 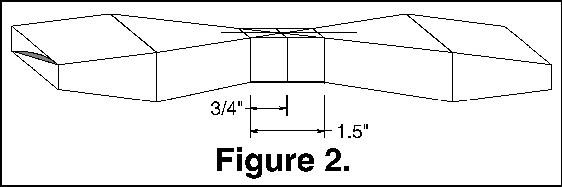 STEP 1) Cut the block to the proper outside dimensions - 1 inch x 1.25 inch x 10 inches, or for slightly less pitch, 7/8 inch x 1.25 inch x 10 inches.
STEP 2) Draw the prop blank layout on the block - make sure the prop shaft hole location is centered on the block. STEP 3) Use a drill press to drill an 0.052 inch diameter hole ( a #55 drill bit) for the prop shaft. Be careful to get the hole centered in the block. STEP 4) Cut the block to the shape shown in Figure 2. If you have a table belt sander, this step is very easy. Just remember that you can make mistakes a lot faster with a belt sander than with a hand saw. Also remember to wear a mask and eye protection - belt sanders make a lot of sawdust very quickly! STEP 5) Carve the bottom of the blades flat, matching the diagonal line drawn on the end of the prop blank. Here again, I took the easy, if somewhat risky way out. With mask and safety glasses on, I very carefully used the table belt sander to sand away the bottom of the blades. Rotating the blank in a smooth twisting motion produced a very nice flat bottom blade contour with the proper blade twist. About six to ten passes for each blade bottom, and I'd saved myself hours of tedious carving. NOT recommended if you don't have a steady hand and a spare block available in case the sander bites too deep! STEP 6) Draw the top surface of the airfoil on the end of the prop blank (see the end of the block in any of the figures). STEP 7) Carefully carve and sand the top of the blades to an airfoil shape. Here again, I used the belt sander to speed things along. It takes a little more care to get a curve on the top surface, so go more slowly. The result should look like Figure 3. The airfoil line in the middle of the right prop blade is there only to show blade shape. There is no step in the blade. It should be smooth from the hub to the tip.  STEP 8) Shape the prop hub so that it's final dimensions are 5/16 inch wide and 5/8 inch deep. Be careful to keep the top and bottom hub faces flat. Bearing plates will have to be glued to these surfaces. If you use a block that is 7/8 inch thick instead of 1 inch thick, the 5/8 inch dimension will be 1/2 inch. 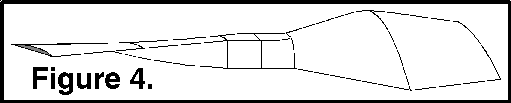 STEP 9) Contour the blades into the hub, and sand the blades smooth so that the prop looks like Figure 4. STEP 10) Make up top and bottom bearing plates from 0.025 x .25 sheet brass as shown in Figure 5. 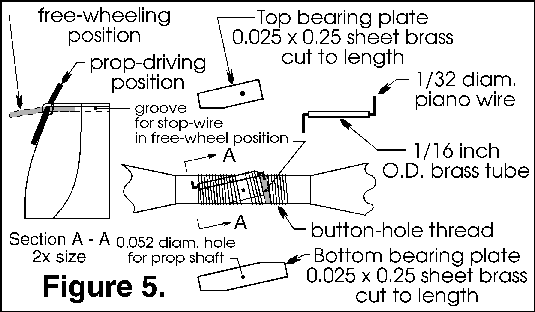 Start by Drilling 0.052 holes in a piece of 0.025 brass strip ( so you have something to hang onto), then cut the bearing plates to shape. Make a "Z" bar free-wheel/prop stop from 1/16 inch O.D. brass tube and 1/32 diameter piano wire. Slide a piece of 0.047 piano wire through the top plate, the prop hub, and the bottom plate to properly position the plates, and glue them in place. Make a groove in the prop hub at the end of the top bearing plate for the free-wheel wire to fold down into. Make another groove in the hub next to the plate for the 1/16 brass tube, and glue in place. DO NOT USE CYANOACRYLATE ADHESIVE!!! (C/A, or Superglue). It will instantly glue the wire into the tube, and you'll have to start over. Carefully glue and wrap the bearing plates and brass tube to the prop hub with button-hole thread and let dry. Make sure the wire moves freely in the brass tube, and that it folds down out of the way into the groove at the end of the top bearing plate to allow the prop to free-wheel. When the glue is dry, clean out the prop shaft hole with the 0.052 inch drill in a pin vise. STEP 11) The prop is now ready to be used. Bend your favorite rubber hook on one end of a piece of 0.047 piano wire, slide it through the back of the nose block, add a couple of washers, slide the prop onto the wire, and bend the front of the wire into a winding loop. This 10 inch diameter balsa prop was lighter than the 8 inch plastic prop, so I was able to take the clay off the tail of my model. The prop gave me more thrust, a longer motor run, and a lighter model overall. I also lost the model on the fourth flight with this prop, so be warned! Wear your best sneakers, or if you've got a suitable chase vehicle, make sure it's running before you launch!
|