| Back to the Plastic Scale Modeling page |

|
|
International Rescue's Thunderbird No. 2 - The Movie Version the 1/450 scale BAN-DAI kit by Michael Morrow 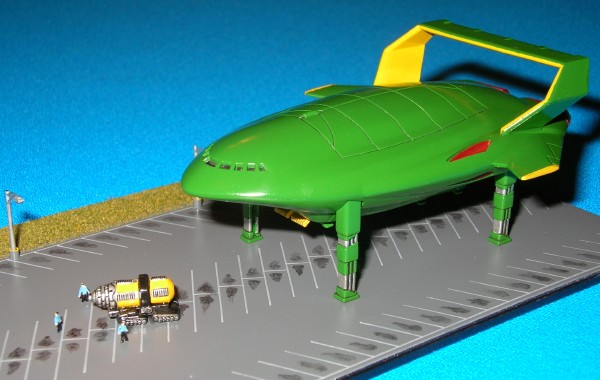
|
|
The Northwest Scale Modelers display case exhibit at the Museum of Flight has provided much inspiration and active participation amongst our local club members over the years. The displays are theme-based, each display covering some unique aspect of air and or space flight, and when the Science Fiction display was announced, I knew I would participate. The only question was what to build. Since no scale was mandated for this particular display, the only requirement would be whether or not it would fit in the display cases and not take up too much room. I rummaged through my model stash, and found an old snap-together STAR WARS B-Wing fighter, ( presented here )
that was an appropriate size. But what else could I build? The answer presented itself several days later when during a search for STAR WARS B-Wing fighter information, the old BBC marionette puppet show called "International Rescue", with it's fleet of futuristic "Thunderbird" spacecraft and vehicles, was recalled to my fond memory by an internet kit review/build of one of the spacecraft used in the show. Of course, that set off an immediate and frantic search for kits of my favorite spacecraft of the show, Thunderbird No. 2, the huge logistical transport ship used to ferry other vehicles and equipment belonging to the super secret group called "International Rescue" around the globe. The kit had to meet two requirements - it had to be cheap, and it had to be small. Sadly, almost every kit of Thunderbird No. 2 was either very, very expensive, or long out of production. 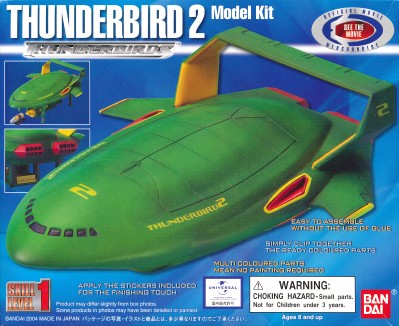 But wait! There, on an internet model shop web-site, was Thunderbird No.2, and it was CHEAP! It was the BAN-DAI 1/450 scale kit of the movie version of Thunderbird No. 2. "Wait. There was a movie?", I thought to myself. "How did I miss that?" But missed it I had. I immediately ordered the kit. Quick research followed. Could I back-date the kit to the original puppet show version? Sadly, no. It was similar, but not close enough to be practical. But it was a Thunderbird No. 2, so I was quite excited when the kit arrived in the mail. I opened it up and . . .
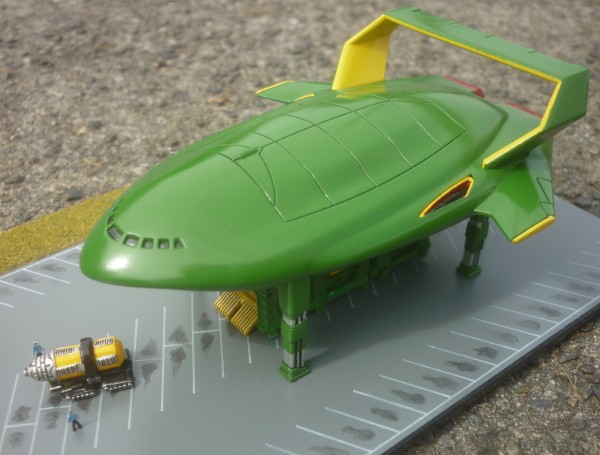
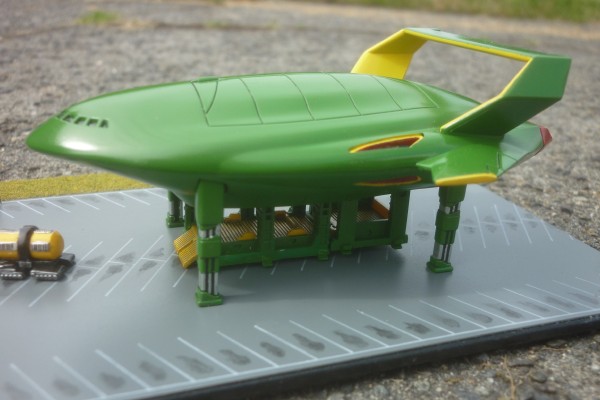
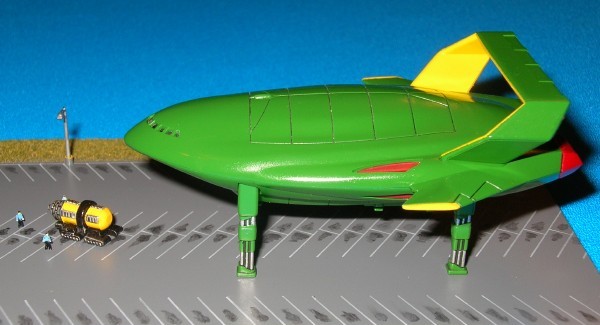
 "Wow. This thing is really tiny," I says to myself. So tiny in fact, that it presented a unique problem - how to show how huge the "real" Thunderbird No. 2 was with just a tiny little kit like this. The model was only 4" long, with a wingspan of just 3". I had expected it to be slightly bigger, but it turns out that the "movie" version of Thunderbird No 2 was smaller than the original No. 2. In any case, perspective would be needed - some way to show the size of the real thing compared to things everyone was familiar with. I remembered seeing a ship model in an even smaller scale at the Seattle IPMS Spring Show one year, where tiny little stubs of plastic sprue had been very effectively painted to represent sailors - dark pants, lighter shirts, flesh heads, and dark hair all combined to make a tiny stick look human, even though it didn't have any arms or legs! I decided I would take the same approach. The Build The BAN-DAI 1/450 scale Thunderbird No. 2 is a snap-together kit, so there aren't a lot of parts. The kit did include a small, nice two-piece model of the "Mole" (also the movie version), one of International Rescue's specialty vehicles, and instead of a removeable cargo pod, it had moveable drop-down loading ramps on which the "Mole" could be displayed if the extended landing gear were used. The "decals" were cheesy peel-and-stick-on plastic affairs which fairly screamed "TOY", and were thick enough to be ugly. I did not use them. I toyed with the idea of cutting the cargo pod top and bottom out of the fuselage halves, scratch-building a cargo pod, and displaying it in the dropped position, but time was a factor in this build, so I elected not to. Between the boxtop and internet references, the color scheme was pretty well established. I spent a good deal of effort trying to mix the exact color green used on Thunderbird No. 2, but it seemed to vary from reference to reference, and I ended up with a cross betweeen the dark green on the original No. 2 and the almost bright green used on the movie posters for the movie version. I pre-painted as many of the parts as possible, and grudgingly replicated the rather garish bright yellow trim shown on the box-top. 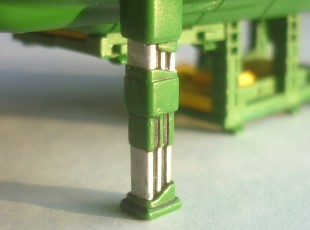 There was little opportunity for detailing, the landing gear legs being one of the few parts with detail on them, so they were carefully painted, and using a technique borrowed from GUNDAM modeling, seam lines on the legs were detailed with a super-fine-point felt-tip pen.
 |
|
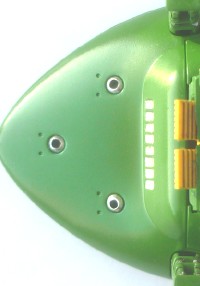
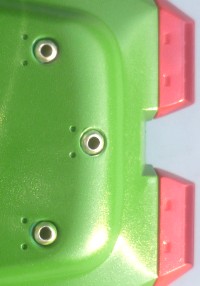
There were six landing jet nozzles visible that pressed into the bottom of the fuselage from the inside. Three were integral on one part at the front, and the other three were integral with a second part at the back. Before the top and bottom halves of the body were assembled, I took the opportunity to emboss the six landing jet nozzles with chrome Bare-Metal foil, which looked quite realistic. |
|
|
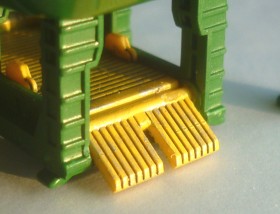 The corrugated floors of the drop-down loading ramps were painted yellow, and given a wash of thinned black oil paint. The cargo pod lines on the top of the fuselage and the control surfaces on the wings were also givin the oil paint wash treatment using a very fine brush, and then it was time to assemble the model. Fortunately, the fit between the top and bottom fuselage halves was exemplary, as it would have been near impossible to detail the tiny jet nozzles and windscreen panels on a model this size after the fact.
 |
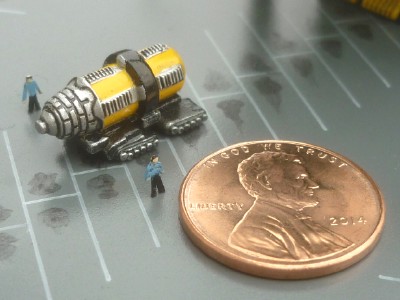
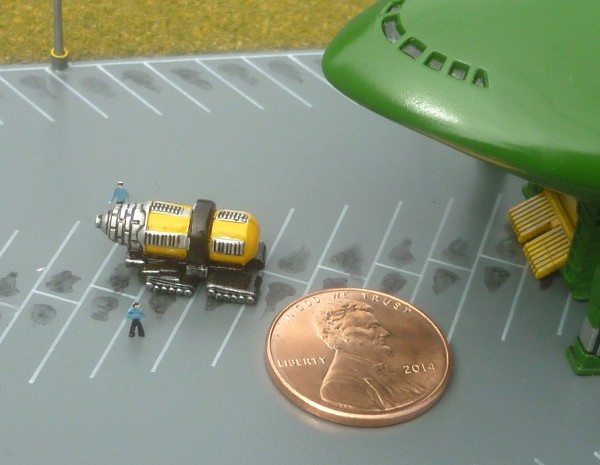
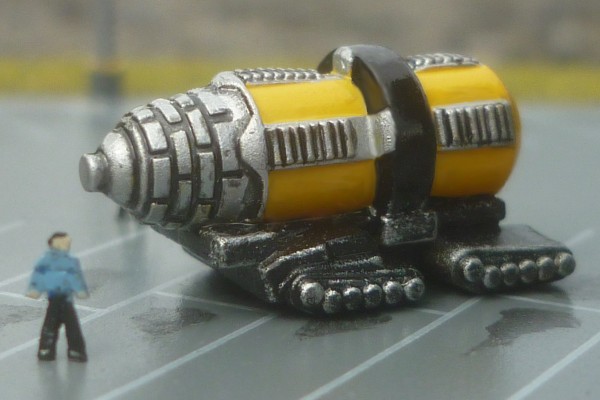
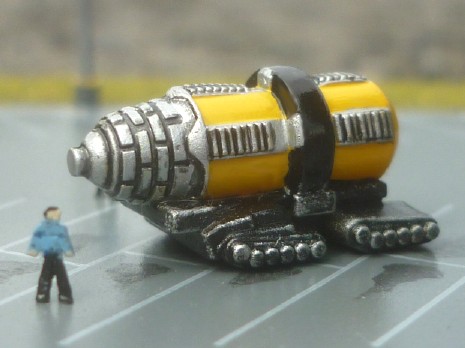 One of the neatest parts of the model turned out to be the little "Mole" model. This tiny little two-part model is only 0.725 inches long, but with careful painting makes into a really neat little piece and greatly enhances the model display. The two halves of the "Mole" were glued together, and after they were dry, I carefully tried to remove all traces of the seam. Then the "Mole" was placed on a flat bit of sandpaper, treads down, and sanded till it sat perfectly flat. A coat of flat white, followed by a coat of yellow for the body was allowed to dry, and then the chassis and the ring around the body were painted black. Silver parts on the yellow body were picked out with a tiny brush, and the boring nose was also painted silver. When the silver was dry, a coat of Future® was applied and allowed to dry, and then using a tiny brush, thinned black oil paint was flowed into all the little detail lines on the nose and the silver bits on the body, producing a most pleasing result. A final dry-brush of silver on the chassis parts to highlight the tread bogies, a final coat of Future®, and it was finished. From a modeling perspective, the "Mole" actually turned out to be the most satisfying part of the kit.
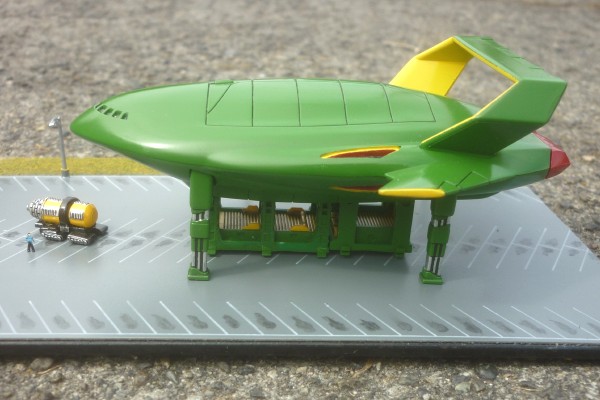
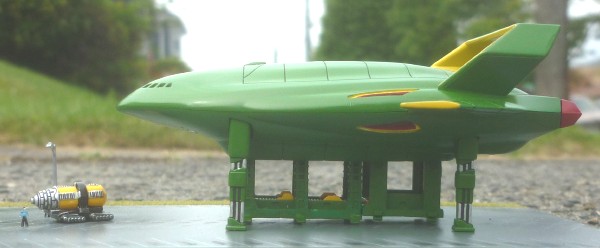
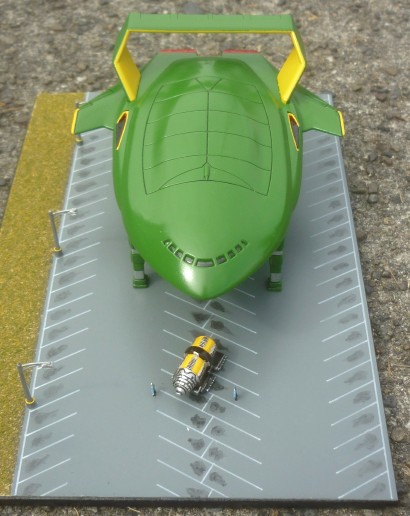
Thunderbird No. 2 and the "Mole" finished, it was time to make a base that would show some scale. Finding a place to land a vehicle the size of Thunderbird No. 2 in real life would be problematic at best, but since it was a VTOL aircraft, I chose an empty mall parking lot. After a preliminary placement of the two models in the approximate arrangement I wanted, I decided on a model display base of 4" by 6" made from 1/8 inch thick particle board. I cut a piece of sheet plastic about 3.25" by 6", painted it grey, and then taped it to the drafting board. After working out the size of 1/450 scale parking spots, I made up a spacing template to tape over the parking lot and carefully inked parking spot spaces onto my parking lot using white acrylic ink in my Koh-i-noor drafting pen. By some freak accident, I managed to ink the entire parking lot without making any mistakes. Most cars drip a little oil while parked, and over time, parking spots acquire an oil stain at the front end, so a thinned oil paint mixture was smeared at the front of each parking spot to look like oil. The painting finished, the back of the parking lot was sprayed with spray adhesive and stuck on the particle board base. A 3/4 inch wide strip of model railroad grass 6" long was cut, sprayed with adhesive on the back, and pressed onto the board next to the parking lot. The edges of the model base were colored black with a black waterproof felt pen, and the basic base was finished. 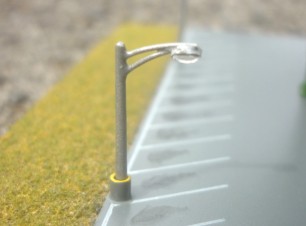 Never having seen a parking lot without street lamps, I drew up a 25 foot tall street lamp pole to 1/450 scale and made three of them from stretched plastic sprue. Each pole assembly was about 0.67 inches tall. A piece of clear sprue was sanded lengthwise so that a section through the sprue matched a lamp's profile, and then little sections of sprue were cut off for the lamps themelves, and glued to the lamp posts. Watching people park, it is entirely understandable that the bottom of street lamps in parking lots are protected by large concrete bases. To represent the concrete bases, small sections of plastic tubing were cut to length, painted grey, and the tops painted warning yellow. When dry, they were glued to the parking lot an equal distance apart. The lamp poles were inserted into the holes and glued in place, and the parking lot was done.
 |
The finished 1/450 scale parking lot . . . same size as a 4" by 6" note card . . .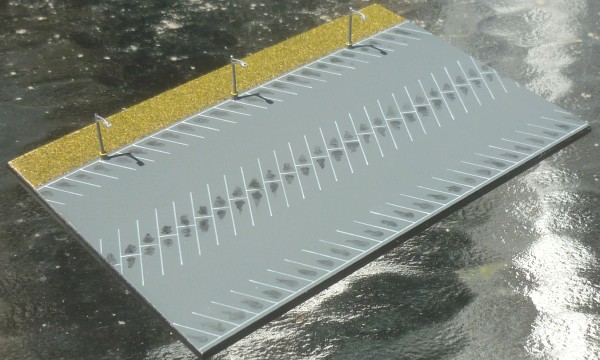
|
|
The parking lot itself was done, but it still needed people to show the true proportions of Thunderbird No. 2, so back to the drafting board I went. I found a scale drawing of a man in an ergonomics book, and drew him to 1/450 scale. He was just 0.16 inches tall! I taped a piece of styrene plastic to the drafting board, taped my 1/450 scale man template over the plastic, and re-drew the 1/450 scale man with a very sharp #11 blade. It took several tries, but I finally managed to get three little men with all their limbs more or less intact. A few minutes with a small paint brush, and I had three little men in black pant, blue shirt, International Rescue crew member uniform colors. I glued my miniature men to the parking lot, and it was finished. |
 "What do you think, Scott?" |
With all the components of the display finished, I merely had to set them in place, and the display was complete. 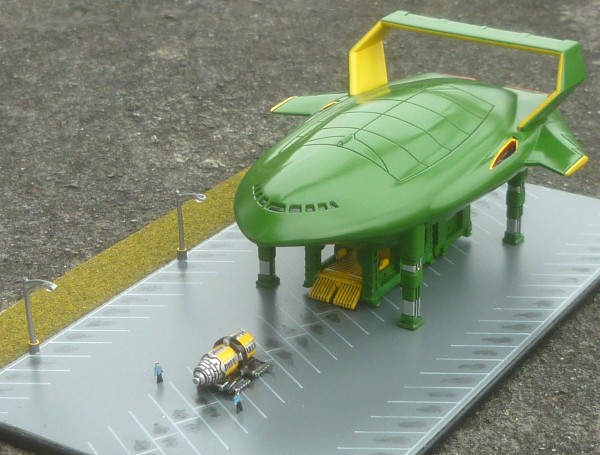
|
|
|
|
|
|
|
|
|
|

|
|
|
|
| Back to the Plastic Scale Modeling page |
|